Monday, November 28, 2011

Gelatin Candy

Working with Gelatin has not been entirely easy, but once you get the hang of it, the results are definitely worth it.  Here are some things to remember when making gummy bears, gum drops or gummies:

  1. Pay attention to the water and gelatin ratio.  If you make a recipe and the gummy bears are too soft, try making the same recipe with more gelatin.  Likewise if the gummies are too hard, reduce the gelatin.  I haven not found a lot of great recipes out there for gummies, so the best thing to do is to experiment until you find the texture you are looking for. 
  2. Make sure you stir the gelatin right after adding it to water.  If the recipe calls for the gelatin to soften, sprinkle the gelatin evenly over cold water.  If the gelatin sits in the water in clumps it will harden into a clump and no amount of heat will loosen the resulting glob.
  3. Some recipes recommend using cold or wet molds; however, all gummies are easier to remove from the molds when kept in the freezer.
  4. Homemade gummy candy generally does not call for preservatives.  So be sure to eat them shortly after making them or else keep them refrigerated in an airtight container.
Natural Sugar Gummies Recipe
Natural Gummy Bear Recipe

Natural Sugar Gummies

Since there appears to be a lack of variety in online gummy recipes, I decided to do some experimenting in order to come up with something new.  What I was really shooting for was a softer gummy bear but not one that was too soft.  Luckily, my experiment worked, so here is the recipe.

  • 1/2 cup sugar
  • 2 envelopes unflavored gelatin
  • 1/4 cup water 
  • 1/4 tsp natural food color
  • 1/4 - 1/2 tsp natural flavor extract
Combine the sugar, water and gelatin in a small saucepan and stir. Continue stirring over low heat until the mixture melts. Bring to a boil over medium-low heat.  Continue stirring and simmer for approximately 2 minutes. Lower heat of the mixture starts to burn.  Remove from heat and add the food color and flavor extract.

If using chocolate molds, allow the mixture to cool for a minute and then begin filling the molds. Place the first mold in the freezer while filling the second mold. The Gummies will be easier to remove when the molds have been in the freezer for 5-10 minutes.

Spread a couple tablespoons of sugar on a plate so the gummies will be ready to roll. Use your fingers to peel the gummies one by one out of the molds. The gummies will be sticky so be sure to place them directly in the sugar and roll them immediately.

Gummies come loose from the molds easier if you dip your fingers first in sugar.  If the gummies start to get soft, place the mold back in the freezer for a few minutes. 

Store gummies in an airtight container in the refrigerator. Gummies will spoil if left out.

Return to Gelatin Candy Page

Wednesday, November 23, 2011

Homemade Mint Chocolates

This is possibly the easiest type of natural chocolates that you can make.

It is best to have chocolate molds, a double boiler and foil wrappers for this recipe.

  • 8 oz dipping chocolate (chopped)
  • 1/4 tsp peppermint flavoring oil
Place the chocolate pieces in a double boiler and turn the heat to medium. Stir until the mixture is completely melted. Be sure to monitor the heat so that the water does not boil since steam tends to make chocolate clump. Once the chocolate is melted, stir in the peppermint oil. Spoon chocolate into the molds. Tap the molds to assure there are no trapped pockets of air. Place each mold in the freezer for five minutes or more. Remove molds and pop candies out onto a plate. Wrap individual chocolates in foil wrappers and store at room temperature or cooler.

Mint Chocolate Variations

Using a Regular Pan: If you are using a regular pan, stir the chocolate constantly so that the chocolate does not burn.

Using Bakers Chocolate: If you are using bakers chocolate, stir in a teaspoon of natural shortening before adding the flavoring oil. This will soften the chocolate, so the finished product should be stored at a cooler temperature than when using dipping chocolate.

Making Chocolates without Molds: If you do not have chocolate molds, you can make the mint chocolates by by pouring the melted chocolate into a pan lined with wax paper or dropping spoonfuls of chocolate onto wax paper. If you pour the chocolate in a single sheet, simple break the chocolate apart into pieces once it has cooled.

Flavoring OIl for Candy

Basically, I give up on infusing oils for candy flavoring.  I'm thinking that oils for chocolates are most likely extracted rather than infused with another oil.  I can say this through trial and error since my peppermint infused oil just did not taste right when mixed with chocolate.  I'll have to look into methods for making essential oils since this is probably how peppermint oil for candy is made.  In this case, I would also probably need a peppermint plant in order to have enough peppermint for extracting the oil.  For now, I will stick with the store bought natural varieties of peppermint oil.
 
Mint Flavoring Oil Recipe

Peppermint Flavoring Oil

Tuesday, November 22, 2011

Holiday Chocolate Crisp Suckers

The holidays are definitely the time for chocolate and what's better than crispy chocolate on a stick.  Here's an easy recipe for making chocolates that will make you think you're eating a Nestle crisp candy bar.

  • 8-12 oz Dipping chocolate (chopped) Note: baking chocolate can also be used.
  • 1/2 - 1 cup of natural or organic rice crisp cereal (partially crushed)
  • sucker sticks
  • sucker molds
If you are making suckers, wash and dry your chocolate or hard candy molds. Place sucker sticks in the molds. If you are using a double boiler, you can start melting the chocolate while you prepare the molds. However, if you are melting the chocolate directly in a pan, be sure to monitor and stir the chocolate constantly in order to avoid burning.

Melt chocolate on low heat. If using a double boiler, be sure to avoid boiling the water since steam will make the chocolate clump. Once the chocolate is completely melted, stir in the crushed rice crisp cereal. Add enough cereal so that the mixture is still liquid and not clumpy.

Spoon the chocolate mixture into the molds and tap the molds so that air bubbles do not remain. Freeze each mold tray for five minutes or until the chocolate is frozen. Remove and pop chocolate suckers out of the molds.

Decorating: Wrap the suckers in foil wrappers. If you do not have wrappers with Christmas decorations, use red, green, gold or silver single colored wrappers and then put a cute Christmas sticker on the front of the sucker.

Return to Homemade Chocolates Page

Wednesday, November 16, 2011

Natural Gummy Bear Recipe

  • 8 packets of unflavored gelatin
  • 1/2 cup sugar
  • 1/2 cup water
  • 1 - 1 1/2 tsp natural flavor extract
  • 1/2 to 1 tsp natural food color
Place gelatin, sugar and water in a pot and stir. Continue stirring over low heat until the mixture is completely melted. Stir in the flavor extract and natural food coloring. Fill un-greased molds with the mixture. Place the full molds in the freezer for approximately five minutes. Peel the gummy bears out of the molds with your fingers. Keep refrigerated to avoid spoilage.

Note: This makes a firm gummy.  For a softer gummy, try my Natural Sugar Gummies Recipe.

Gummy bears - First Attempt

This is a wonderful gummy recipe!  So far, I've tried two or three different gummy recipes and have had not so great results.  My first attempt was at making gum drops.  The recipe I used made gum drops that were way too soft and that didn't have a shelf life to speak of.  The second recipe was for juice gummies.  These also were way to wet and did not last.  So this gummy bear recipe is great since it calls for enough gelatin to make solid gummy bears like they are supposed to be.  I will have to find a way to alter the recipe in order to make firm gum drops that will last. 


Gummy Bear Recipe - (Original Recipe)
Natural Gummy Bear Recipe - (Altered to replace processed ingredients)

Peppermint Flavor Oil - Batch #2

This is my second attempt to make a flavoring oil and it was definitely much better than my last try. The main difference between this batch and my first attempt was that I used walnut oil instead of canola.  I believe it made a big difference in the smell and taste of the infused oil once it was done.  The other difference is that in the first batch I used bruised fresh mint and in this recipe, I used fresh peppermint that had mostly dried while in the refrigerator.  The smell of this oil is nice but I don't know how strong it will be until I try it in a batch of chocolate.  I feel much better about using this batch in chocolate though than I do about the first batch since it really didn't smell wonderful.  I will include the notes for the peppermint flavored chocolate once I use this oil in a recipe.

Notes: Ok, I just tried this in chocolate and I wasn't really impressed.  I could taste the peppermint but the taste of the carrier oil was just gross in chocolate.  I guess I need to find another recipe for oil extraction when it comes to using it in chocolates.  I'll look for other uses for this oil but I won't be using it in chocolates.

Peppermint Flavoring Oil Recipe

Return to Infused Oil Page

Friday, November 4, 2011

Lebanese Coke Can Chicken

This recipe incorporates a Lebanese rub with an American way of grilling chicken.

Lebanese Rub
  • 1/2 Tbsp Cinnamon
  • 1/2 Tbsp Salt
  • 1 tsp pepper
  • 1 tsp all spice or cardamon
Heat the grill to 375 F - 400 F. Rinse the chicken well and remove kidneys. Fill a soda can half way full with water and place it upright on a large plate. Stand the chicken up on the soda can so that the legs point forward and rest on the plate. Mix the spices for the rub in a small bowl and then apply the rub all over the chicken.

Once the grill has reached the right temperature, remove the chicken from the plate and stand the chicken and the coke can in the middle of the grill. Close the lid on the grill and cook for an hour to an hour and 15 minutes. Remove chicken with tongs and then carefully remove the coke can. Carve and serve.

A Great Salsa Recipe

Link to Simple Texas Salsa Recipe:

I tried this recipe and loved it.  It is milder than most store bought mild salsa, so try it and increase peppers if you like it hot.  Also, I made this with my own stewed tomatoes rather than canned.  If you want to stew your own, here's a good recipe for stewed tomatoes.  Be sure to let the stewed tomatoes cool down before putting them in the blender with the other salsa ingredients or else you'll have a mess. Another note which is not mentioned in the recipe, is that you should not touch the chilies when cutting them.  To avoid burning hands, hold the chilies using plastic bags or rubber gloves.

Lastly, I like to make things like this and can them.  However, when I canned this salsa, it took away the zing and it was almost like it had no spices at all.  I definitely prefer this salsa fresh. 

Wednesday, November 2, 2011

Hard Candy - Sixth Batch

Ouch! Try not to let a drop of molten hot candy drip on your hands.  This is the first time I've been burnt, and hopefully the last.  After the drop fell on my finger, it continued to burn until I detached the drop.  Now my finger is throbbing with pain.  Luckily, this incident did not slow me down and I was able to finish pouring all the candy before it cooled.


So with this batch, I used "Select" brand natural food coloring and Olive Nation Pure Watermelon Extract.  I doubled both the coloring and the flavor extract since natural colors and flavors seem to turn out a little weaker than their chemical counterparts.  No problem though since it improvise and double the amount asked for.  In addition to using natural food color and flavor, I used sugar cane syrup which I made about an hour and a half before I started the candy.  I usually only wait an hour and there was a small amount of crystals forming on the top of the syrup, but I don't think it will be enough to ruin the suckers.  Finally, I used walnut oil to grease the sucker molds since this seemed to work out great in the last batch.  Since these suckers are mainly for family and friends, it will be easy to make sure people don't have food allergies.  However, I may switch to coconut oil for future batches just to be safe.

So the suckers are still in the molds, but I tasted a drip that dropped on the mold and the flavor is nice and strong.  It is definitely a watermelon taste which I am happy with since this is the second time I used the Olive Nation extracts in hard candy.  The first time, I used a chocolate extract that I purchased from Olive Nation which was not Olive Nation brand.  This extract did not work out too well.  However, I was not sure if it was the fault of the extract since that batch was slightly caramelized which usually hijacks the flavor.  I also did not double the amount of the extract as I did with this batch.  So the good news is that I can safely use Olive Nation extracts without any problems and they this batch is a good indication that they should all taste great.
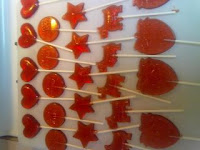
Watermelon Suckers

This is what they look like popped out of the molds. Again, minimal breakage which is great.


Return to Hard Candy Page